

How to Program Indramat CSB Drive Controllers
4 April, 2025 | Indramat CSB Drive Controllers, CSB Drive Controllers, CSB Programming, CSB Troubleshooting, Bosch Rexroth Indramat, IndraWorks, DriveTop, CSB Drive,

How to Program Indramat CSB Drive Controllers from Bosch Rexroth Indramat
By John Forrester
"Wake Industrial is sharing information sourced from the original manufacturer's manual. Please be advised that Wake Industrial does not offer troubleshooting assistance through phone or email. For repair, replacement, or refurbishment needs, we invite you to use our quote form or call us at 1-919-443-0207. It is the user's responsibility to exercise independent judgment and caution when implementing these instructions. Wake Industrial shall not be held liable for any direct, indirect, incidental, or consequential damages to products or individuals resulting from the use of this information."
Bosch Rexroth Indramat CSB drive controllers are powerful single-axis control units used in the IndraDrive servo system. In this comprehensive guide, we’ll explain how to program and commission CSB drive controllers using two primary software tools: DriveTop (the legacy Indramat tool) and IndraWorks (Rexroth’s modern engineering framework). We’ll cover everything from connecting to the drive and setting up communication protocols to configuring drive parameters, using diagnostic tools, and a step-by-step workflow for basic programming. Whether you’re an engineer fine-tuning a servo drive, a plant owner integrating new drives, or a business owner overseeing automation upgrades, this guide will provide the technical details and clarity you need.
Wake Industrial understands the importance of maintaining legacy hardware by offering extensive repair, refurbishment, and replacement services for CSB Drive Controllers. Call Wake Industrial today at 1-919-443-0207 or fill out a quote via the form above to get expert assistance with repairing, refurbishing, or replacing your CSB Drive.
Understanding Indramat CSB Drive Controllers
The CSB series (Control Section Basic) is part of Rexroth’s IndraDrive family, known historically under the Indramat brand. These control sections are designed for modularity and flexibility, sliding onto compatible power sections (such as HCS or HMS series drives) to create a complete servo drive. Key features of Indramat CSB controllers include:
Versatile Communication: CSB units support a wide range of master communication options, from classic interfaces like analog and CANopen to digital fieldbuses. Models are available with PROFIBUS, SERCOS III, or multi-protocol Ethernet ports (branded “Multi-Ethernet”) that can speak Sercos III, EtherCAT, EtherNet/IP, PROFINET IO, and more. For example, a CSB unit with the “ET” communication module (Ethernet) can be integrated into different Ethernet-based fieldbus systems (Sercos III, EtherCAT, EtherNet/IP, PROFINET). This flexibility makes integration with PLCs and controllers convenient regardless of your factory’s network standard.
Basic vs. Advanced Functions: The “Basic” CSB control sections focus on standard drive functions (torque, velocity, position control, etc.), whereas other IndraDrive control sections (like CSH “Advanced” units) might include additional motion logic or features. CSB drives still support Rexroth’s core drive firmware (MPB firmware for single-axis drives) and SafeMotion safety technology options (e.g. safe torque off, safe motion monitoring). A yellow “Safety on Board” label indicates units with integrated safety modules (e.g. Safe Torque Off or Safe Motion).
Diagnostic Display: CSB drives come with a standard control panel – typically a small one-line LCD display and buttons on the front. This HMI panel on the drive shows status codes, error messages, and allows basic navigation through parameters on the device. While an HMI panel is useful for quick checks and simple changes, most programming and commissioning tasks are done via PC software for efficiency.
In summary, Indramat CSB controllers are the “brains” of an IndraDrive, handling communications and control loops. Now, let’s look at the software tools used to program and commission these drives.
Tools and Software for Programming Indramat Drives
Programming Indramat drives involves using Rexroth’s software tools on a PC to connect to the drive, adjust parameters, and monitor performance. The two primary environments you’ll encounter are DriveTop and IndraWorks:
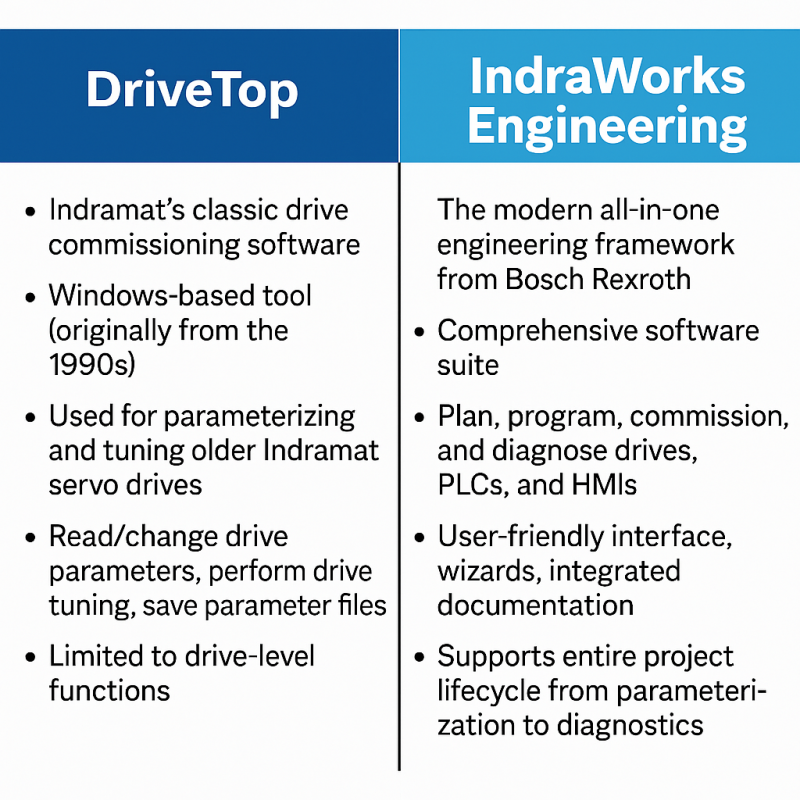
DriveTop: Indramat’s classic drive commissioning software. DriveTop is a Windows-based tool (originally from the 1990s) used for parameterizing and tuning older Indramat servo drives(such ECOdrive series as well as early IndraDrive units. DriveTop connects directly to the drive and allows you to read/change drive parameters, perform drive tuning, and save parameter files. It is limited to drive-level functions. It doesn’t program PLC or motion controllers. DriveTop remains useful for legacy systems and is compatible with IndraDrive to some extent. However, it’s older software that requires specific versions for different drive types.
IndraWorks Engineering: The modern all-in-one engineering framework from Bosch Rexroth. IndraWorks is a comprehensive software suite that can plan, program, commission, and diagnose drives, PLCs, and HMIs in one environment. For drive programming, Rexroth provides IndraWorks Ds (Drive & Diagnostic) – a specialized IndraWorks package focused on drive commissioning and tuning. IndraWorks is the recommended tool for IndraDrive CSB controllers, offering a user-friendly interface, wizards, and integrated documentation. It supports the entire project lifecycle of a machine, from parameterization to operation and diagnostics. With IndraWorks, you can also program PLC logic (IEC 61131-3 via IndraLogic) and design HMI screens (with WinStudio), though those aspects are beyond our focus here.
Which should you use? For newer Bosch Rexroth IndraDrive CSB drives, IndraWorks is the primary tool and offers the most capabilities. DriveTop is typically used for older Indramat drives. That said, if you have an existing setup or comfort with DriveTop, it can interface with IndraDrive CSB controllers as well. In fact, Rexroth documentation notes that the IndraWorks “D” commissioning tool and DriveTop provide similar functionality for setting up drives. In practice, many engineers have transitioned to IndraWorks DS for CSB drives, as it’s updated and supported on modern Windows OS, whereas DriveTop is a legacy tool that even predates Windows XP in origin.
Essential Hardware: Regardless of software, you’ll need a PC (Windows) with the software installed and the proper communication cable to connect to the drive. For older drives or using DriveTop, this is usually an RS-232 serial cable. If using IndraWorks with newer CSB controllers, you will typically use an Ethernet connection (since IndraDrive control sections have an Engineering Ethernet port). We’ll cover connection details next.
Connecting to the Drive: Communication Setup
Properly establishing communication between your PC and the Indramat drive is the first step in programming. The procedure differs slightly between DriveTop (serial communication) and IndraWorks (Ethernet or USB), but we’ll cover both:
- Serial Connection (RS-232) – DriveTop or IndraWorks: Many Indramat drives have a serial interface for engineering. For example, the Indramat DKC drives have a 9-pin serial port. To use DriveTop, connect a serial cable from your PC to the drive’s serial port. Use the correct cable and adapter.
- Ethernet Connection – IndraWorks: IndraDrive CSB controllers usually come with an Ethernet-based engineering port. Using Ethernet offers faster communication and the ability to network multiple drives. To connect:
-
Physical hookup: Plug an Ethernet cable from your PC to the drive’s port. On multi-Ethernet units, typically the ports labeled X21/X22 or P1/P2 can serve as an engineering interface. For initial setup, a direct PC-to-drive connection is simplest.
-
IP Address configuration: By default, a new IndraDrive may have a default IP (check the manuals; some use 192.168.0.1 or 192.168.1.10x ranges, etc.) or it may require you to set an engineering IP address via the drive’s keypad. For example, on some IndraDrive CSB units, parameter 2.3.7 corresponds to the engineering port IP address. Using the drive’s front panel, you can navigate to parameter 2, sub-index 3, sub-index 7 and enter the desired IP (e.g. 192.168.1.100). After setting the IP and cycling power, set your PC’s network interface to an IP in the same subnet (e.g. 192.168.1.50) so that IndraWorks can communicate.
-
IndraWorks device scan: Launch IndraWorks DS and use the Scan or Add Device function to find the drive. IndraWorks can scan a range of IPs or a subnet for connected Rexroth drives. You may also add the drive manually by specifying its IP. When the engineering connection is established, the drive will appear in the IndraWorks project tree. IndraWorks will then allow you to go online with the drive.
- USB or Other Connections: Some newer Rexroth drives support USB or have a mini-USB service port. The CSB series typically does not. Always refer to your drive’s documentation for the available commissioning interface. In most cases, Ethernet is the go-to method for IndraDrive CSB.
Communication Protocols vs. Engineering Connection: Don’t confuse the programming connection (PC-to-drive) with the fieldbus communication the drive uses in operation. For instance, a CSB may be configured for EtherCAT or Sercos III to talk to a PLC – but you might still use an RS232 or Ethernet engineering link to set it up. We’ll discuss the fieldbus master communication setup in a later section. Initially, use whichever PC connection method gets you online with the drive for programming (serial or Ethernet).
Now that we have a connection, let’s move on to the programming workflow: setting up parameters, configuring the drive, and using the tools effectively.
Due to the critical and fragile nature of drive connection ports, it's vital to maintain a regular preventative maintenance schedule. Should you experience any damage or malfunction with your CSB Drive's connection port, contact Wake Industrial at 1-919-443-0207 to receive a repair quote within 15 minutes.
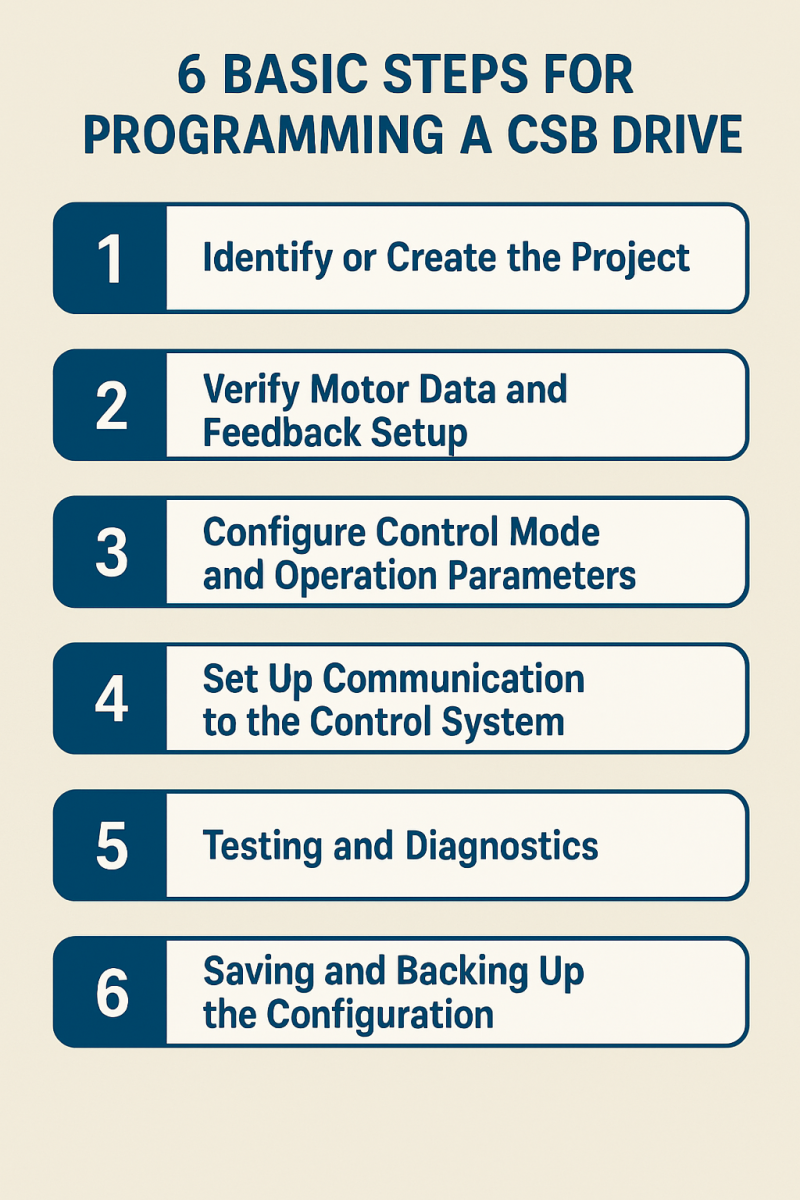
Basic Programming Workflow: Drive Parameters and Configuration
Once connected, programming an Indramat CSB drive involves commissioning the drive’s parameters to match your motor, application, and control system. We will outline the general workflow step-by-step. Keep in mind that IndraWorks and DriveTop interfaces differ, but the fundamental tasks are similar. IndraWorks provides graphical wizards and a project-based approach, whereas DriveTop presents parameter lists and a more text-based interface. We’ll note differences where applicable.
1. Identify or Create the Project
In IndraWorks, you typically start by creating a New Project and adding the drive to it. If you scanned for the device, you can drag it into the project. IndraWorks will load a device profile based on the drive’s type and firmware. It may prompt you to upload the current parameters from the drive into the project. Upload (Read) the drive’s parameters so that you have the baseline. This gives you a starting point and ensures what you see in the software matches the drive’s actual settings.
In DriveTop, there isn’t a “project” concept in the modern sense, but you may need to select the drive model or firmware family when you start. For example, when connecting to a CSB drive, you choose the device type. If prompted, select the appropriate drive type/firmware version. (DriveTop might have separate executables or modules for different drive series.) Once connected, use the Upload or Read All Parameters function to retrieve the drive’s current parameter set into DriveTop.
2. Verify Motor Data and Feedback Setup
One of the first things to configure is the motor parameters. The drive needs to know the characteristics of the servo motor it’s driving (motor type, rated current, encoder details, etc.). Luckily, Indramat drives and motors are often “smart.” Rexroth motors store their parameters in the motor feedback encoder memory, and the IndraDrive will automatically load those values on power-up. In IndraWorks, you can check that the motor name and data have been read correctly. If you see that data populated, you’re in good shape – the drive recognized the motor.
For third-party or non-Indramat motors, you’ll need to enter the motor data manually. IndraWorks offers a motor data dialog or wizard for this. You will input values from the motor’s nameplate (e.g. continuous torque, voltage constant, pole count, encoder resolution). The software can then calculate derived parameters based on these entries. In some documentation, this is referred to as executing a “calculate motor data” command after entering nameplate info. DriveTop similarly has menu options or parameter lists where you set motor type and feedback type. Always ensure the encoder settings match your actual hardware, so the drive can properly read position feedback.
If the drive has an attached motor and feedback is functioning, you should see a status indicating the motor position or at least no feedback error. At this stage, also configure any motor brake control if your motor has a brake.
3. Configure Control Mode and Operation Parameters
Indramat CSB drives can operate in various modes: torque control, velocity control, or position control depending on the firmware and how you plan to use the drive. For basic programming, decide how the drive will receive its command:
- Analog velocity or torque command: If you plan to send ±10V analog signals from a CNC/PLC to command the drive, put the drive in analog mode. This typically involves enabling an analog input as the command source (the CSB’s analog input channel on a I/O extension module) and setting scaling (e.g. 10 V = max velocity or torque). In IndraWorks, this might be under an “Analog inputs” configuration. For example, parameter P‑0‑2900 can set analog input signal type and usage. Also configure velocity or torque limits for safety.
- Fieldbus command (digital position/velocity setpoints): If using a fieldbus like Sercos, EtherCAT, PROFINET, etc., you will generally leave the drive in a mode where it accepts setpoints from the controller via the network. For instance, under “Master Communication” settings in IndraWorks, you might select the profile (e.g. Sercos drive profile, CiA402 for EtherCAT). Ensure the drive is aware of its network address. For Sercos III, the drive might use the fiber-optic ring position or an ID; for CANopen, set the Node ID; for EtherCAT, the address is typically automatic. For Ethernet/IP or PROFINET, assign the appropriate IP address for the drive’s device interface. IndraWorks allows setting these communication parameters in the project tree under the drive’s communication settings. For example, if your CSB has multi-Ethernet, you can choose which protocol to run. Consult the drive manual for the parameter that selects fieldbus mode (often a code in the communication module setup).
- Standalone positioning mode: IndraDrive controllers support an internal positioning mode sometimes called “positioning block mode” or indexing. In this case, you’d program motion profiles into the drive itself. This is more advanced and involves setting up position target tables, accelerations, etc., via parameters or IndraWorks tools. Basic programming usually doesn’t go this deep unless you use the drive with IndraMotion or as a single-axis controller. If needed, Rexroth’s IndraWorks has an interface for configuring positioning tasks, but typically an external motion controller is used, so we won’t cover the details here.
At minimum, set the drive’s operation limits: max torque, max velocity, and acceleration/deceleration ramps. This ensures the drive doesn’t exceed mechanical or safety limits of your system. These settings are found in parameter lists.
Also, configure the controller tuning parameters appropriate to your mode. For example, if in velocity mode, tune the velocity loop. IndraWorks DS provides a Commissioning Wizard that can guide you through tuning. It might execute an auto-tuning routine where the drive makes a small move to measure inertia and recommends gain settings. Alternatively, you can manually adjust P, I, D gains for current, velocity, and position loops under the tuning menus. A well-tuned drive will have stable and responsive performance, so take time to do this with no load initially, then with load.
4. Set Up Communication to the Control System
If your drive will be controlled by an external PLC or motion controller, ensure that the communication interface is fully configured on both ends:
Fieldbus Networking: Make sure the drive is connected to the fieldbus network. If using Sercos III or EtherCAT, the dual ports on the CSB allow line topology – wire them to the next device or terminator as needed. In IndraWorks, activate the fieldbus (for Sercos, you’d typically go through a Sercos phase-up via the controller; for others, the PLC will scan for the drive). You might need to download a device description file to your PLC software:
- Sercos III: The drive’s parameters are accessible via IDNs; typically the Bosch Rexroth controller will use a device description from Rexroth.
- EtherCAT: Import the ESI (EtherCAT Slave Information) XML for the IndraDrive into your PLC’s configuration tool (TwinCAT, etc.). Rexroth provides these files for IndraDrive Cs/C.
- PROFINET IO: Import the GSDML file for the drive into the Siemens/TIA Portal or controller config.
- EtherNet/IP: Use the EDS file for the drive in your Rockwell/Studio 5000 or scanner configuration.
These files define the drive’s I/O assembly, parameters, and profile for the controller. The CSB supports the CiA 402 drive profile for EtherCAT and likely similar profiles for other buses, which standardize how commands and statuses are exchanged.
Drive Address and Parameters: As part of communication setup, double-check the drive’s station address on the bus:
- For CANopen, set the Node ID (e.g. parameter or rotary switches, if present).
- For PROFIBUS, set the node address (DIP switches or param).
- For Sercos, the drive ID might be assigned by physical ring position or via the Sercos address parameter.
- For Ethernet-based, ensure IP addresses are correctly assigned (the drive’s fieldbus IP may be separate from the engineering IP; on multi-Ethernet CSB, usually there’s a method to set the IP if using EtherNet/IP or PROFINET – often by DHCP or a parameter).
In IndraWorks, the “Master Communication” node under the drive will show these settings. For instance, if the CSB has SERCOS III (like model CSB01.1C-S3-ENS-… which has a Sercos III interface), you’ll see S3 as the comm module and possibly settings for Sercos ID. If it’s a Multi-Ethernet (ET), you might see options to choose between protocols or to input an IP for PROFINET. Configure these as needed and save/activate them.
At this stage, you should be able to establish communication between the PLC and drive. For example, in a PLC, you should see the drive come online and be able to exchange I/O (e.g. the drive status word and control word, per the SERCOS or CiA402 standards). If the PLC can control the drive, you’re nearly done with programming – the rest moves into operation.
5. Testing and Diagnostics
With the drive configured, it’s crucial to test that everything is working correctly. This involves enabling the drive, verifying motion, and using diagnostic tools for any troubleshooting:
Enable and Jog the Drive: In a controlled manner, enable the drive’s power stage. In IndraWorks, you can often send an enable command via a control panel interface – a GUI that allows you to simulate the controller’s commands. Once enabled (no errors, and the drive’s status indicates “Ready” or “Operation enabled”), try a simple motion. If you’re in analog mode, you might physically send a small voltage to see movement. If you’re in a fieldbus mode and have the PLC connected, you can issue a jog command from the PLC program. IndraWorks also has a Manual Mode (Jog) feature: for instance, you can use the “Motion” functions to command a velocity or position directly to the drive for testing, if the drive is in a standalone mode. Ensure the motor moves as expected, in the correct direction.
Monitor Diagnostics: Both DriveTop and IndraWorks provide insight into drive diagnostics. IndraWorks excels here – it can display active faults and a history of fault messages. If an error occurs, the drive’s display will show a fault code (like “Fxxx”). IndraWorks will pull the corresponding diagnostic message text. For example, if there’s a configuration error, IndraWorks might show “F262: Parameter save required” or similar. You can even retrieve a log of the last few errors and when they occurred. In DriveTop, you typically see the current error code and can look up its meaning in the manual. Always address any faults before proceeding.
Use the Oscilloscope (Trace) Tool: IndraWorks includes a powerful software oscilloscope that lets you record and plot drive signals in real time (like velocity, torque, following error, etc.). This is extremely useful for fine-tuning and diagnostics. You can access it under the commissioning or diagnostics section. Select variables (e.g. command speed vs actual speed), then start recording while you command a motion. The plotted results will help optimize tuning or see issues) DriveTop also had a basic trace function, but IndraWorks’ is more user-friendly.
Check Fieldbus I/O Data: If using a fieldbus, verify that the control word/status word bits are functioning. For example, when you enable from the PLC, does the drive status word indicate “enabled”? When you send a move command, does the drive’s actual position or velocity return correctly? This handshake confirms your programming of both drive and PLC are aligned.
During testing, you might need to adjust some parameters on the fly. Perhaps the acceleration is too high, or the velocity limit needs increasing. Both DriveTop and IndraWorks allow online parameter changes. In IndraWorks, changing a parameter will often highlight it as modified in the project until you save it to the drive’s non-volatile memory (see next step). Pro tip: Only change one thing at a time and keep notes, so you can revert if needed. And always keep safety in mind – start with low speeds and open loop tests if possible, before a full test in the machine.
6. Saving and Backing Up the Configuration
After you’ve got the drive configured and tested to your satisfaction, it’s important to save the parameters so that the drive retains them on restart and for future reference:
Save to Drive Memory: Indramat drives usually require an explicit save command to store parameters to EEPROM or flash. In IndraWorks, there’s typically a menu option like “Save All Parameters to Device” or executing a command (sometimes called C0003 Save Parameters in IndraDrive context). This writes any changes from RAM into the drive’s non-volatile memory. If you skip this, the drive might revert to old settings on the next power cycle! IndraWorks will often remind you if you have unsaved changes. DriveTop similarly has a “save” function. Perform the save – the drive may briefly display something like “Sto” or a message indicating parameters are being stored.
Backup to PC: Save your project or parameter file on the PC. In IndraWorks, save the project which contains the drive’s setup. It’s wise to also export a parameter list or archive. In DriveTop, you can save a drive file that holds all parameters. This backup will be invaluable if you ever need to reload a drive or compare changes.
At this point, you have successfully programmed the Indramat CSB drive controller. The basic commissioning is done – motor is configured, communications set, and drive tuned for operation.
Diagnostics and Troubleshooting Tips
Even with a perfectly set up drive, you may encounter issues during operation. Here are some additional diagnostic tools and tips specific to Indramat/Bosch Rexroth drives:
- Diagnostic Messages: Every Indramat/IndraDrive fault or warning is indicated by a code on the drive display (e.g. “F###” for faults). IndraWorks will fetch the error text and timestamp for these, which is extremely helpful. Keep the drive’s diagnostic manual handy – it lists all error and fault codes. IndraWorks D commissioning tool can display a log of error occurrences with times, so you can see if a certain fault is repeating. Use this info to pinpoint root causes.
- Oscilloscope (Trace): We mentioned it earlier, but to elaborate: the scope can record multiple signals simultaneously (commonly you record the following error, i.e. difference between command and actual position, to see if the drive is keeping up). It’s also great for diagnosing oscillations – record the motor feedback velocity and you might spot a high-frequency buzz indicating need for a notch filter or gain adjustment. IndraWorks allows exporting trace data if you need to analyze it further.
- Parameter Comparison: IndraWorks can compare the drive’s parameters to a reference. If one axis is working fine and another is not, a parameter comparison can highlight discrepancies.
- Use of IndraWorks Online Help: IndraWorks engineering software includes built-in documentation. If you click on a parameter or a function block, often you can press F1 to get help explaining that item. This is useful if you’re unsure what a particular parameter does.
- Firmware and Project Compatibility: Make sure the drive’s firmware is appropriate for the features you need. CSB controllers ship with a certain firmware version (MPB, etc.). If you open an IndraWorks project created for a different firmware version, there could be slight differences in available parameters. IndraWorks usually handles this gracefully or will prompt for updates. It’s generally best to use the latest compatible IndraDrive firmware for performance and bug fixes.
- Safe Torque Off (STO): If your drive has safety enabled (e.g. the S4 SafeMotion or L3 Safe Torque Off hardware), remember that an open safety circuit will prevent the drive from enabling. IndraWorks has a safety configuration plugin if you have the safety option, where you can view the status of safety channels. For basic operation, you might need to provide a jumper or appropriate signals to the safety inputs to allow the drive to turn on. Always follow the safety wiring diagram provided in the manual.
- Reinitializing or Resetting Parameters: If things are really tangled, note that IndraDrive supports restoring factory defaults. This can usually be done by executing a special command (often by setting a particular parameter or via IndraWorks context menu). This will reset all parameters to default. Use with caution – you’ll lose your current settings, but it can help start fresh if you suspect a wrong setting is causing issues.
By leveraging these diagnostic features, you can maintain the drive’s performance and quickly troubleshoot any problems that arise during commissioning or production.
Conclusion: Efficient Programming and Next Steps
Programming Indramat CSB drive controllers may seem complex, but with a structured approach it becomes a manageable task. We covered how to connect to the drive, use DriveTop for legacy configurations and IndraWorks for modern commissioning, configure all key parameters, and utilize diagnostic tools for validation. By following a step-by-step workflow and utilizing the rich features of IndraWorks or DriveTop, engineers and technicians can quickly commission drives, fine-tune performance, and integrate Indramat drives into broader automation systems. Always refer to Bosch Rexroth’s official documentation for in-depth details on parameters and safety – the manuals are comprehensive and provide additional insights on optimization.
Finally, remember that maintaining a support plan plays a key part in keeping your production running. If you need assistance with Indramat CSB drives – whether sourcing a replacement unit or repairing a faulty drive – reach out to Wake Industrial by calling 1-919-443-0207 or via the quote form on the page. Please have your part number and your fault code identified to ensure expedient service.
"Wake Industrial is sharing information sourced from the original manufacturer's manual. Please be advised that Wake Industrial does not offer troubleshooting assistance through phone or email. For repair, replacement, or refurbishment needs, we invite you to use our quote form or call us at 1-919-443-0207. It is the user's responsibility to exercise independent judgment and caution when implementing these instructions. Wake Industrial shall not be held liable for any direct, indirect, incidental, or consequential damages to products or individuals resulting from the use of this information."
Request a Quote
Cary, NC 27513